[localhost:~]$ cat * > /dev/ragfield

Sunday, April 5, 2009

Horrible Visual Studio 2008 Standard Edition installer bug

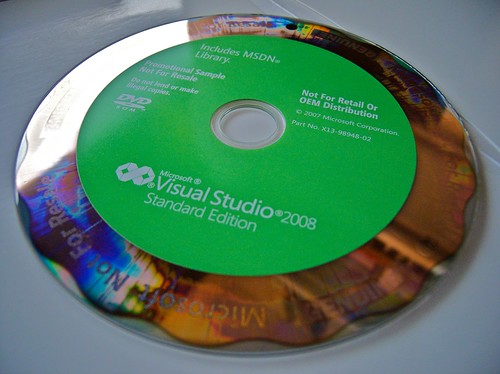
I spend nearly all my time working on a Mac. Given the nature of cross-platform development I do sometimes require use of a Windows machine. Not too long ago I was upgrading to Visual Studio 2008 when I found a horrible bug in the installer.
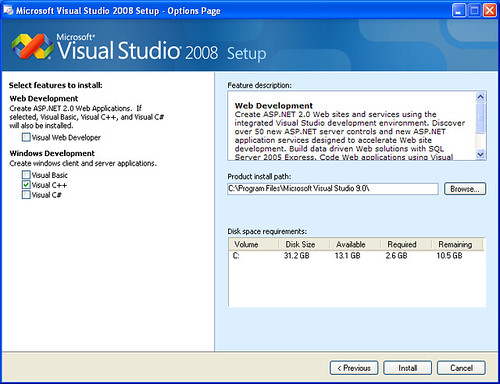
Visual Studio 2008 Installer

I didn't want any Visual Basic or C# crap littering my machine. So I disabled those options, leaving only the C++ tools to be installed. Installation completed and I fired up the compiler only to get the following error message:

Compiling...
Project : error PRJ0003 : Error spawning 'cl.exe'.

Uh.

That's not supposed to happen.

Let's take a closer look:

C:\Program Files\Microsoft Visual Studio 9.0\VC\bin>dir
 Volume in drive C has no label.
 Volume Serial Number is 104F-0033

 Directory of C:\Program Files\Microsoft Visual Studio 9.0\VC\bin

04/05/2009  09:48 AM    <DIR>          .
04/05/2009  09:48 AM    <DIR>          ..
04/05/2009  09:46 AM    <DIR>          1033
04/05/2009  09:48 AM    <DIR>          amd64
11/08/2007  08:19 AM           165,376 atlprov.dll
11/08/2007  08:19 AM            77,312 bscmake.exe
11/08/2007  08:19 AM           670,192 c1.dll
11/08/2007  08:19 AM         2,334,200 c1xx.dll
11/08/2007  08:19 AM            33,784 cvtres.exe
11/08/2007  08:19 AM            17,920 dumpbin.exe
11/08/2007  08:19 AM            17,920 editbin.exe
11/08/2007  08:19 AM            17,912 lib.exe
11/08/2007  08:19 AM           790,008 link.exe
06/05/2006  06:02 PM               268 link.exe.config
11/08/2007  08:19 AM           358,384 ml.exe
11/08/2007  08:19 AM            94,200 nmake.exe
11/08/2007  08:19 AM            20,480 undname.exe
03/07/2007  03:44 PM                31 vcvars32.bat
04/05/2009  09:48 AM    <DIR>          x86_amd64
11/08/2007  08:19 AM            40,448 xdcmake.exe
06/05/2006  06:02 PM               268 xdcmake.exe.config
              16 File(s)      4,638,703 bytes
               5 Dir(s)  12,399,824,896 bytes free

So, no C++ compiler with C++ installation. Perfect.
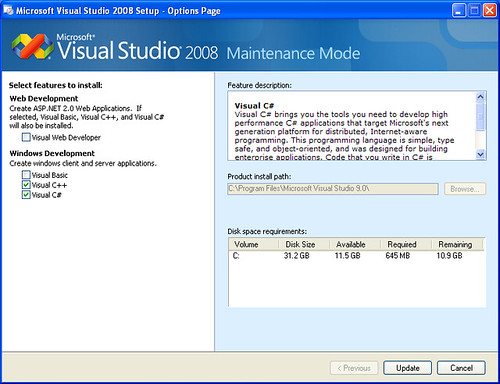
Visual Studio 2008 Installer

On the suggestion of a coworker I also installed the C# tools. Low and behold the C# tools included the C++ compiler, and my problems went away:

C:\Program Files\Microsoft Visual Studio 9.0\VC\bin>dir
 Volume in drive C has no label.
 Volume Serial Number is 104F-0033

 Directory of C:\Program Files\Microsoft Visual Studio 9.0\VC\bin

04/05/2009  10:43 AM    <DIR>          .
04/05/2009  10:43 AM    <DIR>          ..
04/05/2009  09:46 AM    <DIR>          1033
04/05/2009  09:48 AM    <DIR>          amd64
11/08/2007  08:19 AM           165,376 atlprov.dll
11/08/2007  08:19 AM            77,312 bscmake.exe
11/08/2007  08:19 AM           670,192 c1.dll
11/08/2007  08:19 AM         2,334,200 c1xx.dll
11/08/2007  08:19 AM         2,356,720 c2.dll
11/08/2007  08:19 AM           125,936 cl.exe
06/05/2006  06:02 PM               268 cl.exe.config
11/08/2007  08:19 AM            33,784 cvtres.exe
11/08/2007  08:19 AM            17,920 dumpbin.exe
11/08/2007  08:19 AM            17,920 editbin.exe
11/08/2007  08:19 AM            17,912 lib.exe
11/08/2007  08:19 AM           790,008 link.exe
06/05/2006  06:02 PM               268 link.exe.config
11/08/2007  08:19 AM           358,384 ml.exe
11/08/2007  08:19 AM            94,200 nmake.exe
11/08/2007  08:19 AM            20,480 undname.exe
03/07/2007  03:44 PM                31 vcvars32.bat
04/05/2009  09:48 AM    <DIR>          x86_amd64
11/08/2007  08:19 AM            40,448 xdcmake.exe
06/05/2006  06:02 PM               268 xdcmake.exe.config
              19 File(s)      7,121,627 bytes
               5 Dir(s)  12,437,422,080 bytes free

I find it fairly shocking that this configuration was never tested before the bits left Microsoft.

Friday, April 3, 2009

Video with telemetry data overlay

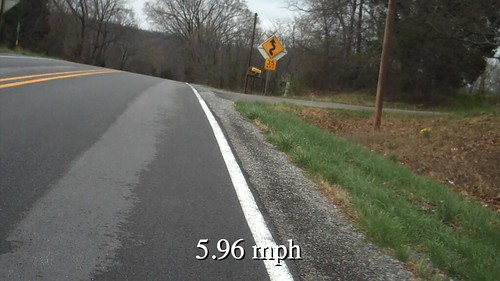
At my cycling team's training camp last weekend I used my Flip video camera to record video of some of the hill descents. Several teammates thought it would be neet to see the video with telemetry data (such as speed) overlayed on top of it. Since I had my GPS recording at the time it was a straightforward matter to create such a video. Here's how I did it.
In preparation I exported my GPS data to a GPX file, which Mathematica can import. Next, I used QuickTime Player Pro to convert the movie into a sequence of PNG images, which Mathematica can import.
Set the working directory to this notebook's directory for convenience.
SetDirectory[NotebookDirectory[]];
Import the data from the GPX file.
xml = Import["Descent.gpx", "XML"];
Pull out all the "trkpt" elements.
trkpts = Cases[xml, XMLElement["trkpt", _, _], Infinity];
Length[trkpts]
204
First[trkpts]
XMLElement[trkpt, {lat->37.6150774, lon->-89.2330897}, {XMLElement[ele, {}, {222.6824951}], XMLElement[time, {}, {2009-03-29 16:09:18}]}]
Extract the latitude/longitude/elevation/time from each trackpoint.
latitudes = ToExpression["lat" /. #[[2]]]& /@ trkpts;
longitudes = ToExpression["lon" /. #[[2]]]& /@ trkpts;
elevations = Cases[trkpts, XMLElement[
    "ele", _, {e_String}] :> ToExpression[e], Infinity];
dates = Cases[trkpts, XMLElement[
    "time", _, {t_String}] :> DateList[t], Infinity];
pts = Transpose[{latitudes, longitudes, elevations}];
Compute the distance between each successive trackpoint.
distances = GeoDistance[
    GeoPosition[#[[1]], "WGS84Original"],
    GeoPosition[#[[2]], "WGS84Original"]
]& /@ Partition[pts, 2, 1];
Compute the time interval between each successive trackpoing.
times = First[DateDifference[#[[1]], #[[2]], "Second"]]& /@
    Partition[dates, 2, 1];
Speed = distance/time. Convert from Meter/Second to Mile/Hour.
<<Units`
speeds = (Convert[# Meter/Second, Mile/Hour] Hour/Mile)& /@
    distances/times;
Since there are more video frames than GPS trackpoints we're going to want to know what the speed is between trackpoints. To do this we'll create an InterpolatingFunction. At any time between two trackpoints we'll estimate the speed to be a linear interpolation between the speed at those two points.
absoluteTimes = Drop[AbsoluteTime /@ dates, 1];
interp = Interpolation[Transpose[{absoluteTimes, speeds}]];
For each frame of the video we will import the PNG file, compute the speed for that frame of video, draw the speed on top of the video, then export the new frame.
processFrame[i_Integer] := Module[
    {label, istr, img, g},
    label = ToString@NumberForm[
        interp[First[absoluteTimes]+i*1/29.97], {Infinity, 2}];
    label = StringJoin[label, " mph"];
    istr = IntegerString[i, 10, 4];
    img = Import[StringJoin["Descent", istr, ".png"]];
    g = Show[
        Rasterize[img],
        Graphics[Style[{
            Text[label, Scaled[{0.5, 0.1}], {0, 0}],
            Style[Text[label,
                Offset[{-4, 4}, Scaled[{0.5, 0.1}]], {0, 0}]
            , FontColor -> White]
        }, FontSize -> 72]]
    ];
    Export[StringJoin["DescentProcessed", istr, ".png"], g];
    g
];
processFrame[1]
DescentProcessed0001
Call the processFrame[] function for each frame (and wait a potentially long time).
With[{start = 1, stop = 9606}, Monitor[
    Do[processFrame[i], {i, start, stop, 1}],
    ProgressIndicator[Dynamic[(i - start)/(stop - start)]]
]]
Once all the frames have been exported we can recombine them back into a single movie using QuickTime Player Pro.

Download Mathematica Notebook

Thursday, April 2, 2009

Xcode project templates for MathLink applications

Setting up an Xcode project to build MathLink applications can be confusing and tedius. Therefore I have created Xcode project templates for MathLink applications.

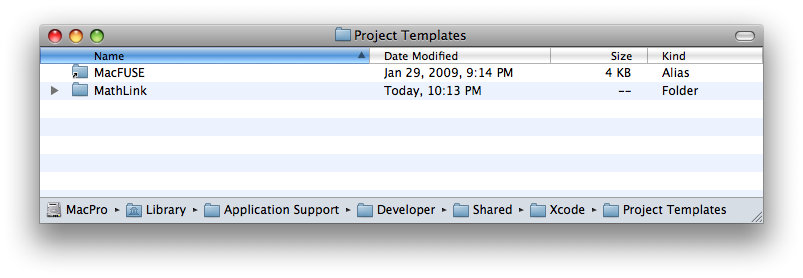
Xcode project template installation

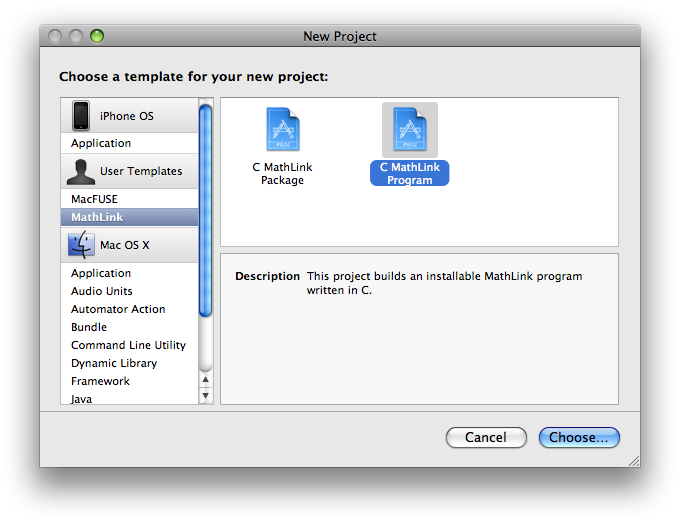
Download the templates here. Install the "MathLink" directory into "/Library/Application Support/Developer/Shared/Xcode/Project Templates/". After installation, when you create a new project in Xcode there will be a User Templates section that contains a MathLink subsection. Click on MathLink and find the two project templates.

Xcode project templates

The first project template is called C MathLink Program. Use it for the very simplest of applications where you want to implement a function (or a few functions) in C/C++ and call it directly from Mathematica. The project will create a single executable (.exe extension, yes, .exe, yes, on Mac).

Build the target and begin using it in Mathematica with the Install command.

Note: if Mathematica is installed in a different location than /Applications/Mathematica.app you will need to adjust the value of the user defined MATHEMATICA build setting in the target info window.

l = Install["~/Desktop/MyTest/build/Debug/MyTest.exe"]
LinkObject[/Users/schofield/Desktop/MyTest/build/Debug/MyTest.exe, 153, 9]
LinkPatterns[l]
{MyTest[arg1_Integer, arg2_Real, arg3_String]}
MyTest[23, 4.5, "67"]
23

The second project template is called C MathLink Package. Use it for more complicated applications that require both C/C++ code and supporting Mathematica code. The support code goes into init.m.

Tuesday, March 31, 2009

FlickrCalendar

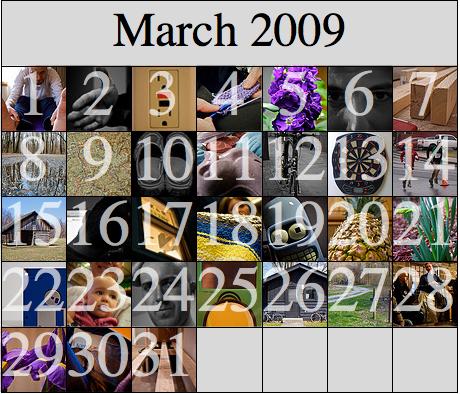
I take (at least) one photo each day and designate it my Photo of the Day. I have a set on Flickr with all of these photos and I thought it would be interesting to look at these in a calendar layout. I wrote a simple Mathematica package to do some basic photoset and photo management on Flickr. Using this package it is a simple matter to download all the Photos of the Day for a given month and arrange them in a calendar layout.
Load the Flickr package.
<<Flickr`
Get a list of all my photosets.
Short[sets = FlickrPhotosets[]]
{72157610604254463->Photo of the Day, <<22>>, 72157609839542329->S…on}
Get the ID of each photo in the "Photo of the Day" set.
set = First[sets]
72157610604254463->Photo of the Day
photos = FlickrPhotosetPhotos[set,
    {2009, 3, 1, 0, 0, 0}, {2009, 4, 1, 0, 0, 0}]
{3320801525, 3325013076, 3327845866, 3330214268, 3332574152, 3333951749, 3336286979, 3339612210, 3343616292, 3346180622, 3347410349, 3349861835, 3352196443, 3355574796, 3358281254, 3361319213, 3364753768, 3366450803, 3368858991, 3372005764, 3374713192, 3377655879, 3381457738, 3384282674, 3386926438, 3389038038, 3390498631, 3394129518, 3396858987, 3400094291, 3402856851}
Length[photos]
31
Import the 75x75 pixel "Square" sized thumbnail of each photo.
squares = FlickrPhotoImport[#, "Square"]& /@ photos;
First[squares]
Calendar tile
Overlay the day of the month on top of each thumbnail.
tiles = Table[
    Show[Rasterize[squares[[i]]],
        Graphics[{
            White, Opacity[0.667],
            FontSize -> 64,
            Text[ToString[i], {Center, Center}]
        }]
    ], {i, Length[squares]}
];
First[tiles]
Calendar tile
Get the URL of each image and make the tiles hyperlinks.
urls = First["urls" /. FlickrPhotoInfo[#]]& /@ photos;
First[urls]
http://www.flickr.com/photos/ragfield/3320801525/
tiles = Table[Hyperlink[tiles[[i]], urls[[i]]], {i, Length[tiles]}];
Now write a reusable calendar[] function which takes a list of content and lays them out into a grid for the specified month.
daysInMonth[year_Integer, month_Integer] := Part[
    {31,
    Which[
        Mod[year, 400] === 0, 29,
        Mod[year, 100] === 0, 28,
        Mod[year, 4] === 0, 29,
        True, 28
    ], 31, 30, 31, 30, 31, 31, 30, 31, 30, 31}, month
];
calendar[
    year_Integer,
    month_Integer,
    content_List,
    opts___
] := Module[
    {startDate, startDay, daysOfWeek, days},
    startDate = {year, month, 1, 0, 0, 0};
    startDay = DateString[startDate, "DayNameShort"];
    daysOfWeek = {"Sun", "Mon", "Tue", "Wed", "Thu", "Fri", "Sat"};
    
    (*
    if the month starts in the middle of the week
    prepend some empty strings to the content list
    *)

    days = Join[Table["",
        {Position[daysOfWeek, startDay][[1,1]] - 1}], content];
    
    (*
    if less content was specified than days in the month
    pad the end of content list
    *)

    days = Join[days, Table["",
        {daysInMonth[year, month] - Length[content]}]];
    
    (*
    if the month ends in the middle of the week
    append some empty strings to the content list
    *)

    days = Join[days, Table["",
        {Mod[7 - Mod[Length[days], 7], 7]}]];
    
    GraphicsGrid[
        Join[
            {Join[{Text[Style[
                    DateString[startDate,
                        {"MonthName", " ", "Year"}],
                    FontFamily -> "Times",
                    FontSize -> 48
                ]]},
                Table[SpanFromLeft, {6}]
            ]},
            Partition[days, 7]
        ],
        opts
    ]
];
Now add the tile images to the calendar.
c = calendar[2009, 3, tiles,
    Spacings -> 0, ImageSize -> 460,
    Dividers -> All, Background -> LightGray]
March calendar
We could export directly to JPEG, but since the image contains hyperlinks exporting to HTML will yield both a JPEG and the HTML code for an image map.
SetDirectory[CreateDirectory["/tmp/FlickCalendar"]];
Export["FlickCalendar.html", c, "GraphicsOutput" -> "JPEG"];

Download Mathematica Notebook

Download Flickr Mathematica package

Image stabilization in iMovie '09

I got the chance yesterday to try out the new image stabilization feature in iMovie '09. It works. Sort of.

Last weekend I strapped my Flip video camera onto the handlebars of my bike while descending a big hill. The resulting footage was pretty jerky. I started iMovie for the first time and it decided to build thumbnails for what seemed like forever. Finally I was able to add my clip to a project and enable image stabilization for it. It took around two hours on my 2.2 GHz dual core MacBook Pro to process five minutes of video. Ouch.

It appears to work by cropping the image frame to give it a few extra pixels in each direction with which to work. It then attempts to match up corresponding sections of subsequent video frames. Finally, it re-expands the cropped image to fill the frame again.

With my particular video there were a few sections which it was able to successfully stabilize, but most of it couldn't be helped. In parts the video was actually worse after stabilization (due to the scaling?). Anyway, here's a brief comparison. The top image is the original (scaled down from HD) video. The bottom frame is the stabilized version from iMovie '09.

I assure you the two videos are synchronized. Notice how the iMovie (bottom) video has a noticeably smaller field of view, slightly washed out colors, and slightly more side-to-side movement, but slightly less jerkiness.

The video was easy to put together in Mathematica. First I saved each movie as an Image Sequence in QuickTime Player Pro. Then I combined the two frames using Mathematica 7's image processing functions. Then I assembled the resulting frames back into a movie using QuickTime Player Pro. Here's the Mathematica code.

processFrame[i_Integer] := Module[
    {n, n1, n2, n3, i1, i2, i3},
    n = StringJoin[IntegerString[i, 10, 4], ".png"];
    n1 = StringJoin["Descent/Descent", n];
    n2 = StringJoin["DescentStabilized/DescentStabilized", n];
    n3 = StringJoin["DescentCompare/DescentCompare", n];
    i1 = Import[n1];
    i2 = Import[n2];
    i3 = ImageAssemble[{
        {ImageResize[i1, {480, 270}]},
        {ImageResize[i2, {480, 270}]}
    }];
    Export[n3, i3]
];
With[{start = 1, stop = 9606}, Monitor[
    Do[processFrame[i], {i, start, stop, 1}],
    ProgressIndicator[Dynamic[(i - start)/(stop - start)]]
]]

I'll bet I could do the stabilization in Mathematica...

Thursday, March 19, 2009

Expressible as the sum of two cubes

Bite my shiny metal ass
Futurama episode 1ACV06 (The Lesser of Two Evils)
Bender: Hey robot, what's your serial number?
Flexo: 3370318.
Bender: No way, mine's 2716057!
(robot laughter)
Fry: I don't get it.
Bender: We're both expressible as the sum of two cubes!
Well that should be easy enough to test with Mathematica. Let's just use a brute force method to check each pair of numbers {i, j} that adds up to number n where i is in the range of 0 to the cube root of n and j is in the range of 0 to i.
flexo = 3370318;
bender = 2716057;
SumOfTwoCubes[n_Integer] :=
Catch@Do[
    If[i^3 + j^3 == n, Throw[{i, j}]],
    {i, n^(1 / 3)},
    {j, i}
];
SumOfTwoCubes[flexo]
{119, 119}
SumOfTwoCubes[bender]
So this test found the two numbers whose cubes add up to Flexo's serial number, but it did not find the two numbers whose cubes add up to Bender's serial number. Interesting. This problem must be trickier than I first thought. Indeed it is. A coworker pointed out that the first test only searches half of the possible numbers--it completely excludes negative numbers!
Okay, let's rewrite the test to include negative numbers. The absolute value of i must no longer be constrained to the cube root of n since one of the terms can be negative. We must instead search all values between -∞ and ∞. Hmm. That might take a while. Okay, instead we'll just deal with numbers whose cubes are expressible as a 32-bit signed machine integer and we'll stop the search as soon as we find the answer. Additionally, we'll have to add an additional test where the smaller of the two values (in this case j) is negative. We know it must be the smaller of the two since their sum is positive.
BetterSumOfTwoCubes[n_Integer] :=
Catch@Do[
    Which[
        i^3 + j^3 == n, Throw[{i, j}],
        i^3 + ( - j)^3 == n, Throw[{i, - j}]
    ],
    {i, (2^31 - 1)^(1 / 3)},
    {j, i}
];
BetterSumOfTwoCubes[flexo]
{119, 119}
BetterSumOfTwoCubes[bender]
{952, - 951}
Tricky television writers.
Update: Paul Abbott points out in the comments that there's a far better way to solve this problem:
Reduce[i^3 + j^3==3370318, Integers]
i==119&&j==119
Reduce[i^3 + j^3==2716057, Integers]
(i== - 951&&j==952)||(i==952&&j== - 951)
I must admit that I've never used the Reduce function before so this was a bit of a surprise to me, but a welcome one at that.

Download Mathematica notebook

Wednesday, March 18, 2009

Using stack based object constructors as function parameters

In C++, if the type of a function parameter is a bare class or a const reference to a class then it is not necessary to pre-create an object to pass into that function. You can use one of the class' constructors in place. For example:

class Graphics;
class Point;
...
void drawPoint(Graphics& g, const Point& p);
...
// The first argument is a non-const reference,
//   so the object must already exist
// The second argument is const reference,
//   so it can be created on the spot
drawPoint(g, Point(0, 0));

The constructor for the stack based object is called first, then the function is called, then the destructor for the stack based object is called last.

This is potentially very useful when combined with auto_ptr (or similar classes):

void foo(class Bar* b);
...
// A new "Bar" object is created, passed into
//   the foo() function, then destroyed
//   automatically after foo() is called.
foo(std::auto_ptr<Bar>(new Bar(...)));

Polygons with holes in Mathematica

The Mathematica graphics language has a Polygon primitive, but (as of Mathematica 7) there is no way to create a Polygon with holes punched out (more specifically, any polygon with two or more contours). However, there is a fairly good way to fake this feature.

  1. Draw the first polygon contour.
  2. Draw a line from the ending point of the first contour to the starting point of the second contour.
  3. Draw the second polygon contour.
  4. Repeat steps 1-3 for N contours
  5. Once all contours are drawn, draw a line from the ending point of contour N-1, then N-2, ..., all the way back to contour 1. These are the same ending points we used earlier, except in reverse order.
MultiContourPolygon[polys_List] := Module[
    {contours=Append[#, First[#]]&/@polys},
    {
        Polygon@Join[Join@@contours, Reverse[First/@contours]],
        Line[contours]
    }
]
Graphics@MultiContourPolygon[{
    {{0, 0}, {0, 1}, {1, 1}, {1, 0}},
    {{.25, .25}, {.75, .25}, {.75, .75}, {.25, .75}},
    {{.4, .4}, {.6, .4}, {.6, .6}, {.4, .6}}
}]
Polygons with holes

Mathematica's built-in PDF import feature uses this same algorithm to represent arbitrary multi-contoured paths from PDF files.

Import["ExampleData/mathematica.pdf"]
Polygons with holes 2

Download Mathematica notebook

Tuesday, March 17, 2009

Use Quartz2D Python bindings to rasterize HTML

Since (I believe) Mac OS X 10.2, the CoreGraphics framework (Quartz2D) has included incredibly useful bindings for the Python language. This makes it very easy to test code and to automate graphics related tasks.

A few days ago a colleague asked if I knew a simple way to automate the creation of image previews of web pages. In a couple minutes I whipped up a short Python script to do just that.

#!/usr/bin/python
import os, sys
from CoreGraphics import *

# what size image should we create?
w = 600
h = 430

# get the input and output file paths
if len(sys.argv) < 3:
	print 'usage: %s inputfile.html outputfile.png' % sys.argv[0]
	sys.exit()

input = sys.argv[1]
output = sys.argv[2]

# read the input file
f = open(input)
html = ''.join(f.readlines())
f.close()

# draw the HTML into a Quartz bitmap context then write that image to a PNG file
ctx = CGBitmapContextCreateWithColor(w, h, CGColorSpaceCreateDeviceRGB(), (0, 0, 0, 0))
ctx.drawHTMLTextInRect(CGDataProviderCreateWithString(html), CGRectMake(0, 0, w, h))
ctx.writeToFile(output, kCGImageFormatPNG)

Download Python script

Unfortunately, this simple script has a fairly major limitation. It doesn't do any network access, so the HTML file and all accompanying resources must be stored somewhere on your file system.

Call by reference in Mathematica

Parameters values passed into Mathematica functions are immutable. However, one can fake "call by reference" behavior in Mathematica by giving the function a Hold* (HoldAll/HoldFirst/HoldRest) attribute. That way the function can directly modify the variable passed to it.

Attributes[MyFunc] = HoldAll;
MyFunc[a_Symbol]:=(a[[2]] = 2.2);
b = {1., 2., 3., 4.}
{1.`, 2.`, 3.`, 4.`}
MyFunc[b];
b
{1.`, 2.2`, 3.`, 4.`}

Download Mathematica notebook

The drawback to doing this is that you have to pass a variable into the function. Passing a literal value will not work.